RIPv2로 연결한 두 라우터의 시리얼 링크 캡슐화를 기본값 HDLC에서 PPP로 바꾸고 PAP 인증을 적용했습니다. 암호를 일부러 틀려 debug ppp authentication으로 실패 메시지도 확인했습니다.
1. 배경
OSI 2계층의 WAN 프로토콜로는 ATM, 프레임 릴레이, HDLC, PPP 등이 있습니다. Cisco 시리얼 인터페이스의 기본 캡슐화는 HDLC(Cisco 전용 확장)라서 다른 제조사 장비와는 맞지 않고 인증 기능도 없습니다. PPP는 표준 프로토콜이며 PAP, CHAP 인증을 지원합니다.
2. 토폴로지
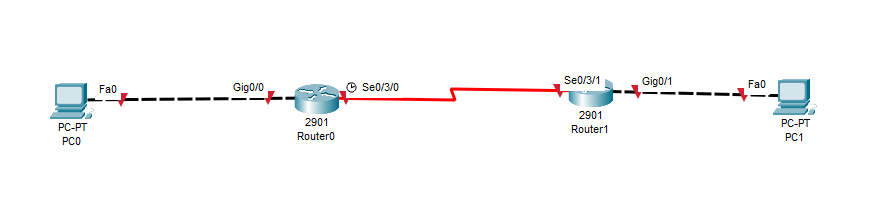
토폴로지
| 장비 | 인터페이스 | IP |
| PC0 | - | 192.168.0.1/24 |
| PC1 | - | 172.168.0.1/24 |
| Router0 | Gig0/0 | 192.168.0.254/24 |
| Router0 | Se0/3/0 | 10.0.0.1/24 |
| Router1 | Gig0/1 | 172.168.0.254/24 |
| Router1 | Se0/3/1 | 10.0.0.2/24 |
172.168.0.0 대역은 사설 대역(172.16.0.0/12)이 아닙니다. 실습 토폴로지에서만 쓰고, 실제 환경에서는 사설 대역을 사용합니다.
3. 기본 설정 (IP와 RIPv2)
동적 라우팅은 RIPv2를 씁니다. 자세한 내용은 앞의 동적 라우팅 실습 글을 참고합니다.
3.1 Router0
Router> enable
Router# configure terminal
Router(config)# hostname R0
R0(config)# interface gi0/0
R0(config-if)# ip address 192.168.0.254 255.255.255.0
R0(config-if)# no shutdown
R0(config-if)# interface se0/3/0
R0(config-if)# ip address 10.0.0.1 255.255.255.0
R0(config-if)# no shutdown
R0(config-if)# exit
R0(config)# router rip
R0(config-router)# version 2
R0(config-router)# network 192.168.0.0
R0(config-router)# network 10.0.0.0
3.2 Router1
Router> enable
Router# configure terminal
Router(config)# hostname R1
R1(config)# interface se0/3/1
R1(config-if)# ip address 10.0.0.2 255.255.255.0
R1(config-if)# no shutdown
R1(config-if)# interface gi0/1
R1(config-if)# ip address 172.168.0.254 255.255.255.0
R1(config-if)# no shutdown
R1(config-if)# exit
R1(config)# router rip
R1(config-router)# version 2
R1(config-router)# network 172.168.0.0
R1(config-router)# network 10.0.0.0
3.3 연결 확인
PC 사이에 ping이 되면 기본 설정이 끝난 것입니다.

PC0에서 PC1로 ping 성공
R0에서 시리얼 인터페이스를 확인하면 기본 캡슐화가 HDLC인 것을 볼 수 있습니다.
R0# show interface serial0/3/0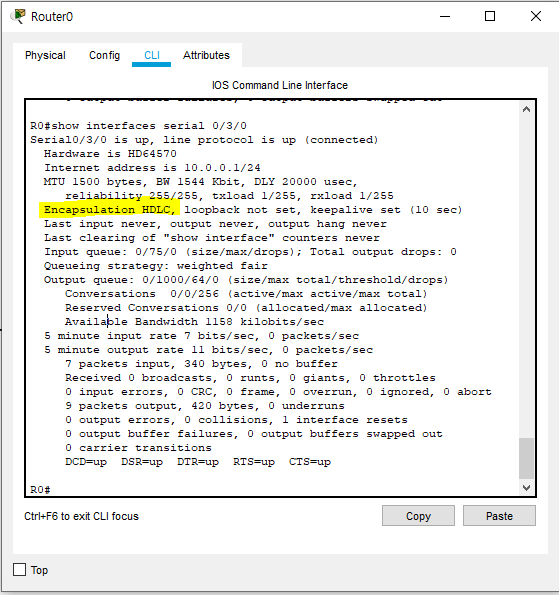
기본 캡슐화 HDLC 확인
4. PPP PAP 설정
ID는 각 라우터의 호스트 이름, 암호는 cisco를 씁니다. username에는 상대 라우터가 보낼 이름과 암호를, ppp pap sent-username에는 내가 보낼 이름과 암호를 넣습니다.
4.1 Router0
R0(config)# username R1 password cisco
R0(config)# interface se0/3/0
R0(config-if)# encapsulation ppp
R0(config-if)# ppp authentication pap
R0(config-if)# ppp pap sent-username R0 password cisco
4.2 Router1
R1(config)# username R0 password cisco
R1(config)# interface se0/3/1
R1(config-if)# encapsulation ppp
R1(config-if)# ppp authentication pap
R1(config-if)# ppp pap sent-username R1 password cisco
4.3 확인
R0# show interface serial0/3/0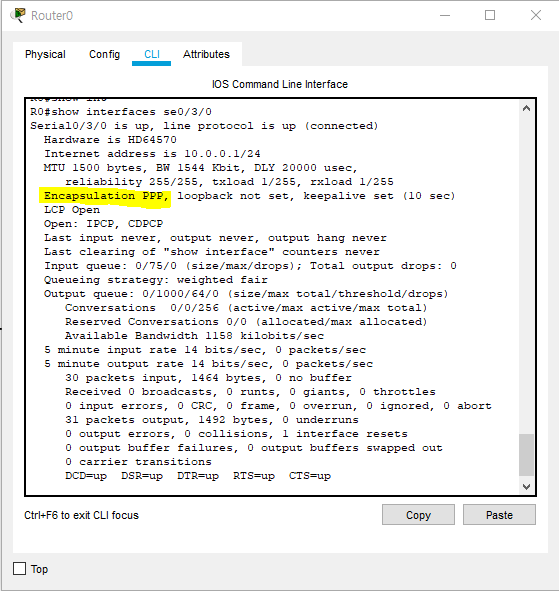
캡슐화가 PPP로 바뀐 것을 확인
5. 인증 실패 확인
R1에서 debug ppp authentication을 켜고, R0의 PAP 암호를 일부러 틀리게 바꿉니다. PAP는 연결할 때 한 번만 인증하므로, 암호를 바꾼 뒤 인터페이스를 내렸다 올려야 다시 인증합니다.
R1# debug ppp authentication

R0(config)# interface se0/3/0
R0(config-if)# no ppp pap sent-username R0 password cisco
R0(config-if)# ppp pap sent-username R0 password cis
R0(config-if)# shutdown
R0(config-if)# no shutdown
R1의 디버그에 인증 실패 메시지가 나타납니다. 디버그 출력은 연결 문제를 찾을 때 가장 먼저 보는 정보라 익숙해 두면 좋습니다.
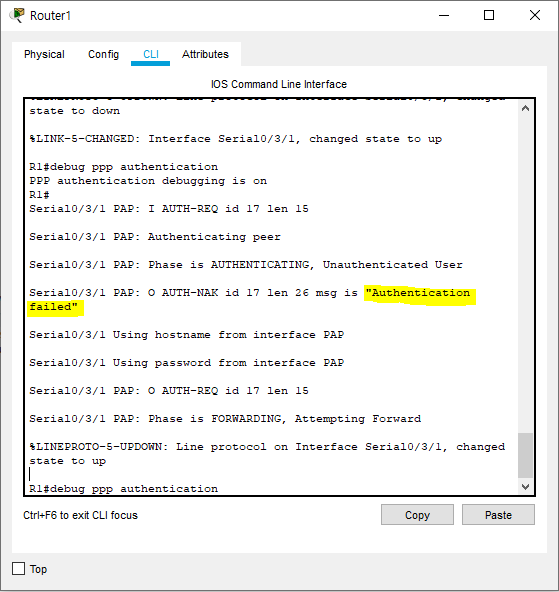
debug ppp authentication의 인증 실패 메시지
6. 정리
- Cisco 시리얼 인터페이스의 기본 캡슐화는 HDLC입니다.
- encapsulation ppp와 ppp authentication pap, ppp pap sent-username으로 PAP 인증을 설정합니다.
- PAP는 암호를 평문으로 보내므로, 다음 글에서 CHAP으로 바꿉니다.
728x90
'Network > 패킷트레이서' 카테고리의 다른 글
| 프레임 릴레이 개념과 용어, 토폴로지 정리 (0) | 2020.09.07 |
|---|---|
| [Packet Tracer] PPP CHAP 인증 설정 (0) | 2020.03.10 |
| [Packet Tracer] STP 동작 확인 (0) | 2020.02.22 |
| [Packet Tracer] VTP로 VLAN 정보 동기화 (0) | 2020.02.06 |
| [Packet Tracer] Port-Security로 스위치 포트의 MAC 주소 제한 (0) | 2020.02.03 |
서울
--:--:--
-전체 글
-카테고리
오늘 방문